At Tilt, our growth team uses Optimizely to do light-weight experiments like inject text into the navbar, change styles, or adjust static pages to test out different designs. Optimizely allows you to easily A/B test your website by injecting client-side JavaScript to do things like inject inline styles or change button text. However, our engineers also use Optimizely for richer experiments - showing completely different versions of the homepage, updating the behavior of a JavaScript widget, and rolling out new product features to employees first for testing. In this post I’ll walk through our experiment setup and show how we use React.js together with the Flux architecture to build an application whose behavior can be easily changed through Optimizely.
What are Experiments?
Experiments are site features that can be displayed to sets of users. The goal of an experiment is to better understand our customers, with an eye towards encouraging desired user behaviors. For example, if the goal is to drive signups from a landing page, you first measure how many customers hit the landing page and create an account. Next, you try different versions of that landing page, and see which one has the best conversions. By experimenting on your website’s traffic, you learn how to build a more effective customer experience.
Of course, getting the analysis right is hard. Variations in traffic and user behaviors need to be statistically significant, which sometimes means you need to run an experiment for days or even weeks at a time. Additionally, while sometimes it’s really easy to improve one metric (clicks on “sign up”) at the expense of another (clicks on “learn more”), that metric may not be the most valuable thing to optimize for your overall business. It’s really important to be driving user behavior that leads to the right long-term result. Because of these gotchas, experimenting can be a bit of a tricky science and it’s really important to make sure you’re doing it right.
To use Optimizely, you include a script tag in your document, which connects your site to Optimizely’s servers to determine which experiments to run. Optimizely allows non-technical people to modify the elements on a website through the Optimizely Visual Editor, and allows them to choose which of your experiments apply to which pages of the website. Using Optimizely, businesses can try out different ideas before they are ready to be baked in as a real part of the product.
We’ve found the Optimizely Visual Editor is best at small changes - updating a call to action button, or changing the copy of the website. We found a need for more full-featured experiments - those that create UI widgets or perform different actions as a result of user flows (creating or contributing to a Tilt, referring a friend to the site). To support these, we needed to build the concept of an experiment into our application, and then set up Optimizely to activate it.
An Experiment: Moving The Activity Feed On The Homepage
Normally the Tilt homepage is very sparse - a navbar, a logo, and a call to action.
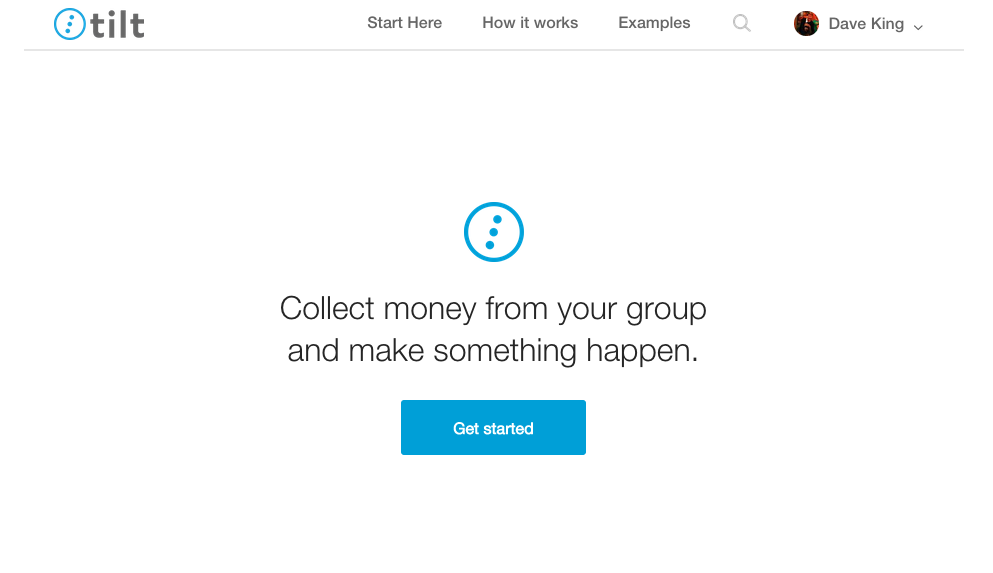
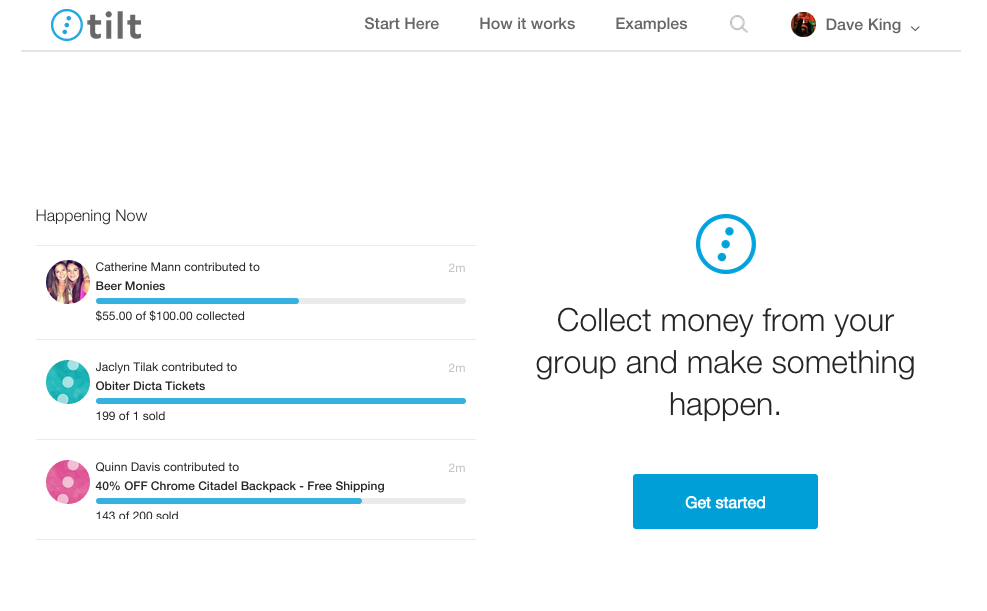
We also have an activity feed of things that are happening on our site - what events people are pooling money for. For public campaigns, your contributions will show up in the global activity feed, so seeing what’s in the feed is a great way for people to understand examples of how they can use the Tilt product for their own needs. A few months ago we ran an experiment that was ultimately unsuccessful - what if we moved the activity feed above the fold on the desktop version of the homepage? Maybe that would spur more people to understand the product and click on the main “getting started” call to action.
This version of the page would look something like the following - activity feed on the left, call to action on the right:
Modifying this directly through Optimizely would be difficult - the activity feed is a complicated JavaScript widget and it’s not clear that we can just lift it from one place on the page to the other using the live code editor. Also, the cycle of testing a change in Optimizely isn’t as good as it could be - you need to set up an experiment, upload it to CDN, and then opt into a “variation” of a paused experiment by activating it with special query parameters. This leads to longer development cycles than normal feature development, where code is served from a local machine and is available quickly on change.
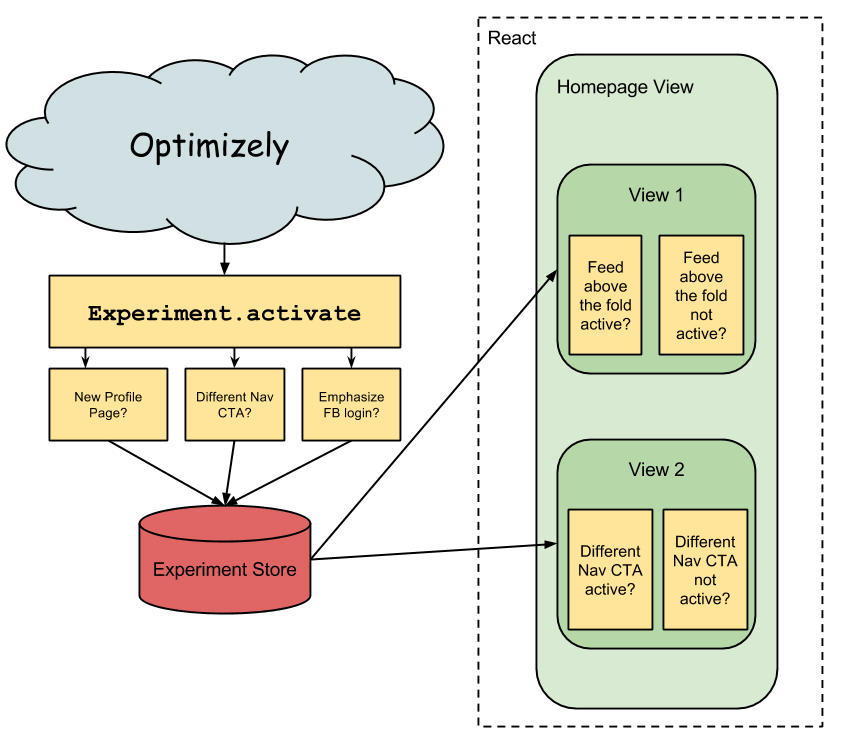
Instead of using Optimizely’s Visual Editor to launch the homepage-feed experiment, we’ll build this experiment into our application. We’re going to use the Flux application architecture - an application architecture that’s different than traditional MVC web applications. A Flux application renders the page based on the contents of the stores. A store is a global set of data that’s associated with some concept in the application - some examples from our codebase at Tilt are a UserStore (with data about the logged in user) and a CampaignStore (with data about a crowdfunding campaign).
Here we’re going to render the page differently based on the contents of the ExperimentStore: if the homepage-feed experiment is “on”, we’ll render one version of the homepage - otherwise, we’ll render the normal version of the homepage. When Optimizely determines that the experiment should be activated, it will invoke an Action Creator to change the state of the stores through injecting custom third-party JavaScript code on page load.
You can think of our experiments setup as a series of lightswitches - depending on the configuration of the lightswitches, the page looks and responds differently. Optimizely has the ability to switch individual lightswitches on and off, immediately updating the rendered state of the page.
Looking At The Code: The Homepage
Like much of our site, the homepage is rendered through React.js. Although React lets you build components that have dynamic behavior through React’s event system, the homepage mostly just renders static markup. Here’s the code for the Homepage component. Without any experiments running, this is the version of the homepage that gets displayed to all visitors of the site. Here we’re using a Bootstrap grid.
var Homepage = React.createClass({
    render: function() {
        return (
            <div className="container">
                <HeroContent />
                <div className="row">
                    <div className="col-sm-5">
                        <h2>Happening Now</h2>
                        <ActivityFeed />
                    </div>
                    <div className="col-sm-5 col-sm-offset-2">
                        <h2>Learn more</h2>
                        <IntroVideo />
                    </div>
                </div>
                <TiltForBusiness />
                <Footer />
            </div>
        );
    }
});
You can see that the Homepage mostly just calls out to other components. The HeroContent component shows the “Collect money from your group and make something happen” copy, along with the Tilt logo and a “Get Started” call to action button. The ActivityFeed and IntroVideo components are placed side-by-side with an extra spacer between them using a Bootstrap grid. The TiltForBusiness and Footer components are static components with links to other resources for people to learn about Tilt.
To make the homepage optionally render the feed above the fold, we add current state of all experiments to the homepage component’s state (as this.state.experiments) and ensure that the component state stays in sync with the value in the store when the store changes. Next, we make the render method conditional on the value of the homepage-feed experiment from this.state.experiments. The current state of all experiments is an Immutable Map, so the value of a key inside the map must be accessed through the .get() method.
var Homepage = React.createClass({

    // Read experiment store in as component state and update it when the store changes

    getInitialState: function() {
        return {
            experiments: ExperimentStore.getExperiments()
        };
    },

    componentDidMount: function() {
        ExperimentStore.addChangeListener(this._updateExperiments);
    },

    componentWillUnmount: function() {
        ExperimentStore.removeChangeListener(this._updateExperiments);
    },

    _updateExperiments: function() {
        this.setState({ experiments: ExperimentStore.getExperiments() });
    },

    // Conditionally render homepage based on component state

    render: function() {
        if (this.state.experiments.get('homepage-feed')) {
            // render page with feed 'above the fold'
            return (
                <div className="container">
                    <div className="row">
                        <div className="col-sm-6">
                            <HeroContent />
                        </div>
                        <div className="col-sm-6">
                            <h2>Happening Now</h2>
                            <ActivityFeed count={8} />
                        </div>
                        <TiltForBusiness />
                        <Footer />
                    </div>
                </div>
            );
        }

        // render normal version of page
        return (
            <div>
                <HeroContent />
                <div className="row">
                    <div className="col-sm-5">
                        <h2>Happening Now</h2>
                        <ActivityFeed />
                    </div>
                    <div className="col-sm-5 col-sm-offset-2">
                        <h2>Learn more</h2>
                        <IntroVideo />
                    </div>
                </div>
                <TiltForBusiness />
                <Footer />
            </div>
        );
    }
});
(In our production code, we use an ExperimentMixin that manages the experiments map as part of a component state, both initially and on store update.)
Looking At The Code: The Experiment Store
At Tilt we use the dispatchr library, that provides a createStore helper method to easily create stores that can be used in a Flux application. Using this helper, the ExperimentStore has the following code:
var Immutable = require('immutable'),
    createStore = require('dispatchr/utils/createStore'),

var ExperimentStore = createStore({
    storeName: 'ExperimentStore',

    initialize: function() {
        this._experiments = Immutable.Map();
    },

    isActive: function(experiment) {
        return !!this._experiments.get(experiment);
    },

    handlers: {
        experimentActivate: function(payload) {
            this._experiments = this._experiments.set(
                payload.experiment.id,
                true
            );
            this.emitChange();
        },
        experimentDeactivate: function(payload) {
            this._experiments = this._experiments.delete(
                payload.experiment.id
            );
            this.emitChange();
        }
    }
});
Looking At The Code: Global Functions for Optimizely
Lastly, we need to provide a “hook” into our store so that Optimizely can activate or deactivate experiments through injecting third-party JavaScript. This looks like:
window.TiltExperiments = {
    activate: function(experimentName) {
        Dispatcher.dispatch('experimentActivate', {
            id: experimentName
        });
    },
    deactivate: function(experimentName) {
        Dispatcher.dispatch('experimentDeactivate', {
            id: experimentName
        });
    }
};
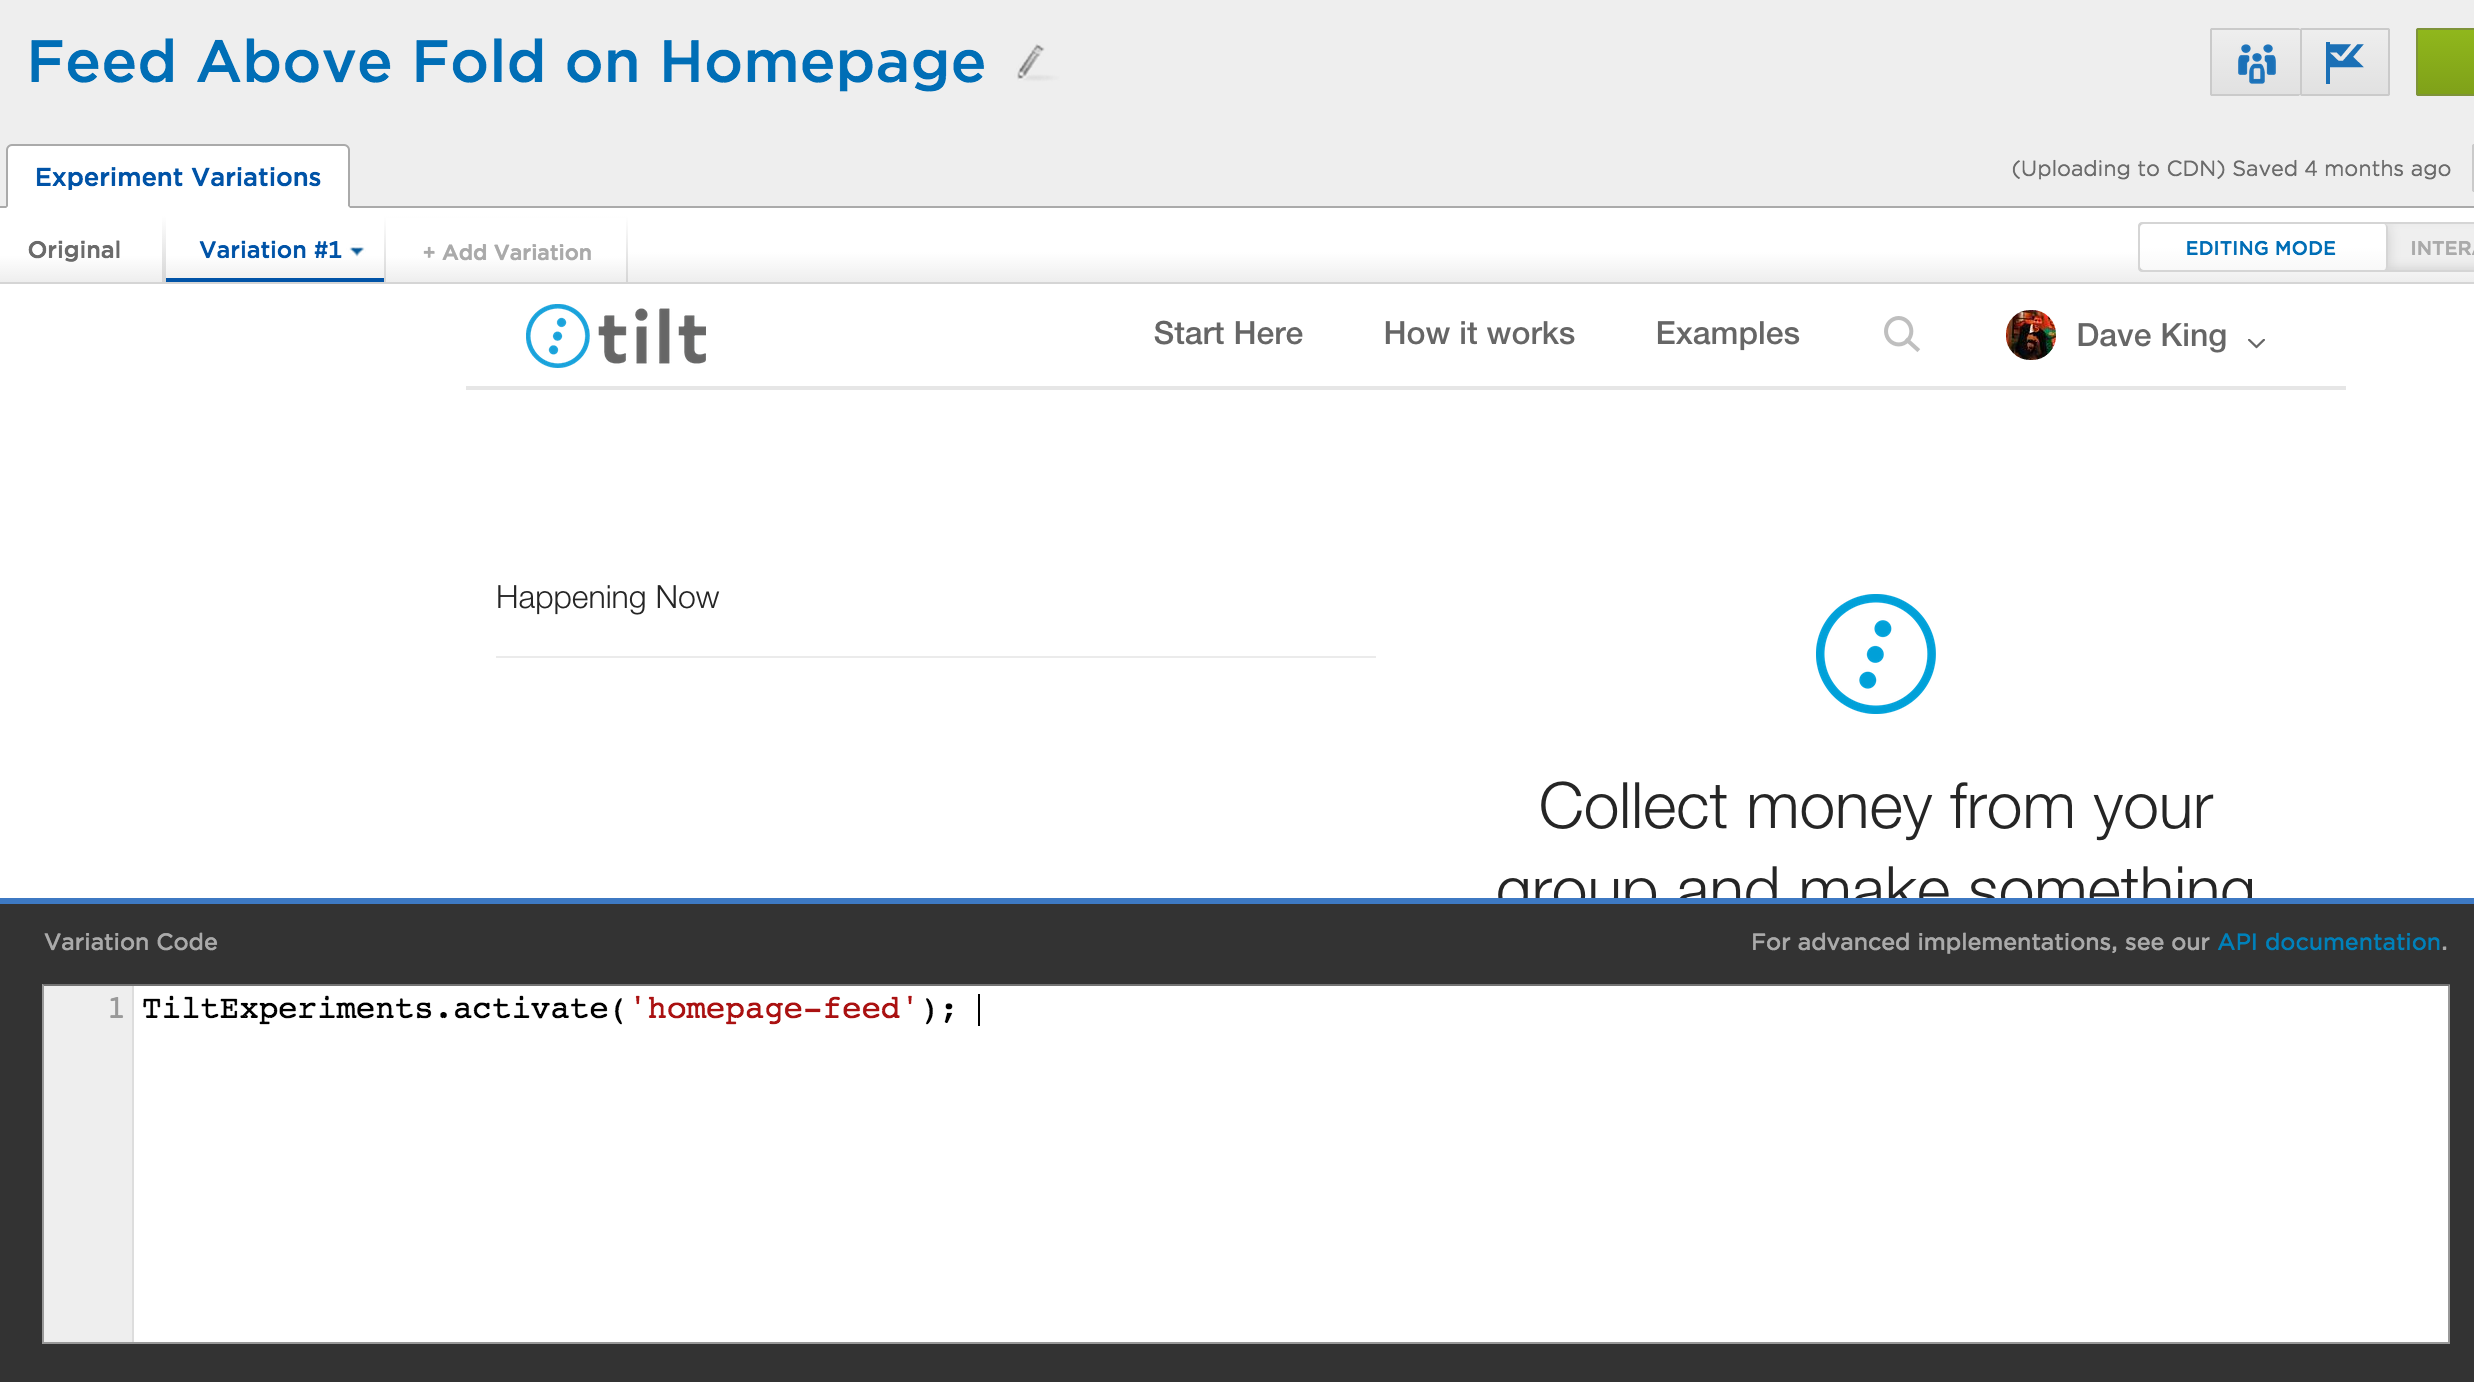
To set up the experiment in Optimizely, we use TiltExperiments.activate('homepage-feed') as the custom JavaScript code. While doing this, you can utilize all of the normal Optimizely A/B test features (audiences, variations, measuring the success of an experiment through monitoring clicks on a call to action or page engagement, URL targeting).
After running this experiment on 50% of our homepage traffic for a week we determined that the experiment was a failure - there was more engagement (more people looking on and clicking the feed), but less people were driven to the ‘get started’ call to action button. We disabled the Optimizely experiment and removed the homepage feed conditionals from our code.
Experiments As Feature Flags
To easily enable developer testing of experiments, we added some glue code so that developers and product managers can opt in to running experiments through a query parameter. By specifying the URL argument ?tilt-experiment=homepage-feed, the experiment homepage-feed will be activated. We’ve also added logic so that a set of active experiments can be saved into a browser’s session storage, allowing for testing experiments that may span multiple pages - for example, showing the tagging lightbox immediately after campaign creation. Together, this allows people to easily share links that conditionally render different parts of the site.
This easily allows for our product teams to develop and test features on a variety of devices without needing to worry about long QA cycles on feature branches or in a staging environment. We recently released a feature where people can tag friends to their tilt - a lightweight way to let your friends know about cool things that they can help make happen (for example: a block party, a tailgate, a local concert). Rather than create a feature branch and release tagging to all users of Tilt at once, we shipped features daily to tilt.com for production testing behind a feature flag.
Next, we opted Tilt employees into tagging using an Optimizely audience to solicit feedback from the rest of the company. Finally, when releasing the feature to customers, we rolled the feature out for all users of the site, again using Optimizely - this way, if a critical bug were discovered in production, we could easily disable the feature. A few days after tagging went live we turned the tagging experiment fully on (by removing the else branch of the experiment conditionals) and disabled the Optimizely experiment.
Conclusion
With past experiment systems I’ve used, logic for displaying different variations of the site was controlled by the server. In order to see the application with different features on or off, you’d have to update a configuration file or change a value in the database, then refresh the page. With React views listening to a centralized ExperimentStore, it’s really easy to toggle between different the versions of the site - all without a page refresh. (While I’ve stuck to a frontend setup for experiments here, it would be straightforward to extend it to the server using React’s built-in server-side rendering.)
Our experiments infrastructure has been a big win for us in terms of simplifying our development process around conditional versions of the site. Additionally, by using them as feature flags, they’ve allowed us to easily test features in production prior to launch - a must have to release high quality software while avoiding long and costly manual QA cycles against unintegrated feature branches.
I’ve extracted the key concepts from this post into a standalone repository that I’ve published on Github - flux-feature-flags. This repository uses the standalone Facebook flux library and webpack to create a demo app with different render behaviors based on the contents of the ExperimentStore.
Finally, if you’re on your laptop, you can check out “Homepage Feed” experiment at tilt.com by following this link! (Because of the lack of horizontal space, the mobile homepage looks about the same when the experiment is on or off.)
This was also posted to the Tilt Engineering Blog. Thanks to Will Wolf who helped me with many edits that greatly improved the clarity of my writing.